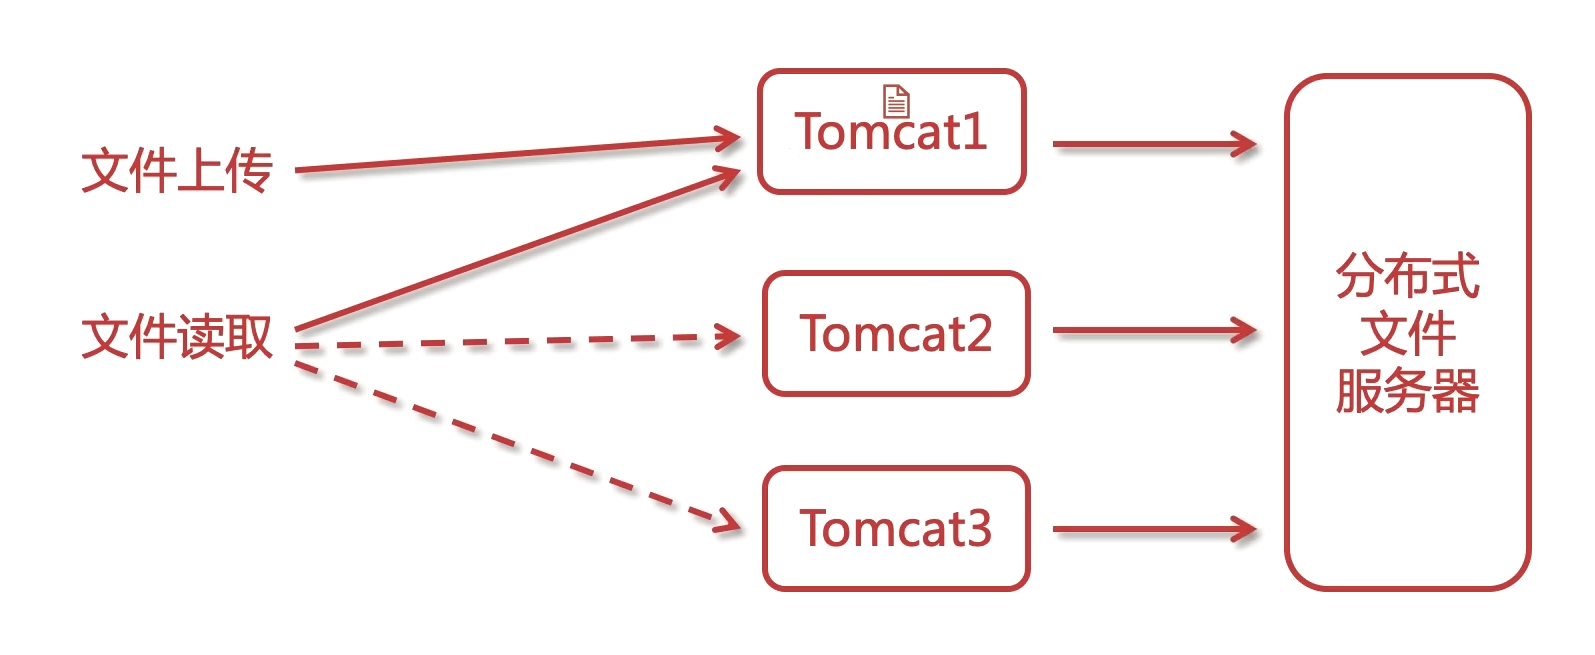
分布式搜索引擎
技术选型
所有搜索引擎共有的特点, 倒排序索引.
- Lucene: 类库, 鼻祖, 基于Java的全文搜索引擎。
- Solr: 基于Lucene二次开发, 是Apache的. 比如netflix, 亚马逊在使用. 集群可以通过zookeeper实现。
- ElasticSearch: 基于lucene的. PB级别的搜索, github以前是基于Lucene的, 现在使用ES。
SQL搜索的弊端
- 空格支持
- 拆词查询
- 搜索内容不能高亮
- 海量数据查库
分布式搜索
- 搜索引擎
- 分布式存储与搜索
ES核心术语
- 索引 index 表
- 类型 type 表的逻辑类型
- 文档 document 行
- 字段 fields 列
ES核心概念
- 映射 mapping 表结构定义
- 近实时 NRT Near Real Time
- 节点 node 每一个服务器
- shard replica 数据分片与备份
ES集群相关
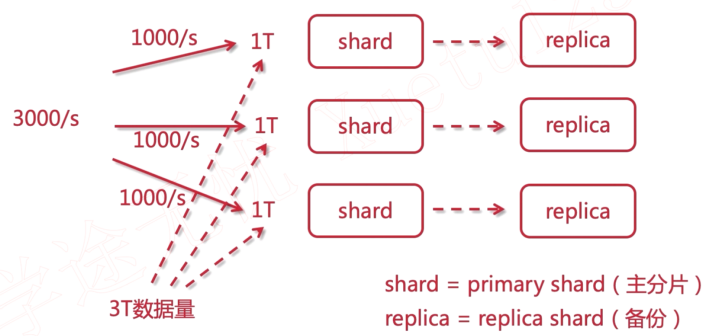
- 分片(shard): 把索引拆分为多份, 分别放在不同的节点上, 比如有3个节点, 3个节点的数据内容加起来就是一个完整的索引库。分别保存到三个节点上, 目的是为了水平扩展, 提高吞吐量.
- 备份(replica): 每个shard的备份.
倒排索引
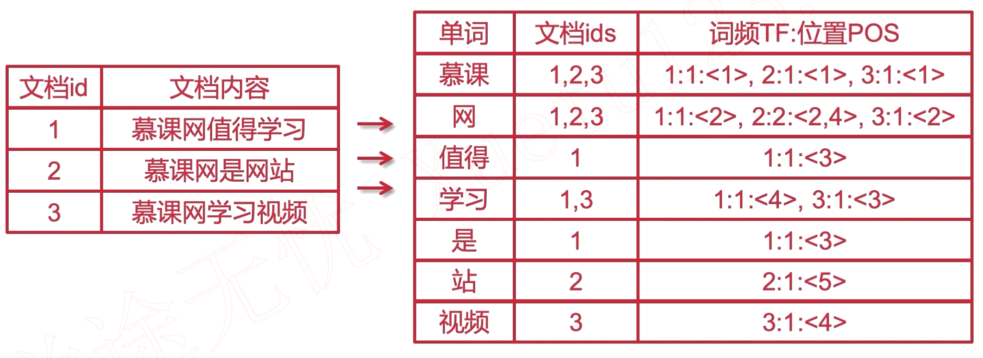
倒排索引源于实际应用中需要根据属性的值来査找记录. 这种索引表中的毎一项都包括一个属性值和包含该属性值的各个记录地址. 由于不是根据记录来确定属性而是根据属性来确定记录的位置, 所以称之为倒排索引.
安装elasticsearch
下载地址, 选择合适的系统版本. https://www.elastic.co/cn/downloads/elasticsearch
# 解压到指定目录
tar -zxvf elasticsearch-7.10.0-linux-x86_64.tar.gz -C /usr/local
cd elasticsearch-7.10.0
mkdir data
cd config
# 核心配置文件 elasticsearch.yml
vim elasticsearch.yml
vim jvm.options

# 启动 不能使用root用户启动
whoami
# 创建新用户
useradd -c lgq51233 esuser
# 修改密码
passwd esuser
# 创建后的密码保存在 /etc/passwd 中
# 返回到elasticsearch-7.10.0的根目录, 对新创建的用户授权
chown -R esuser:esuser /usr/local/elasticsearch-7.10.0
cd bin
# root切换用户不用密码
su esuser
./elasticsearch
# 后台启动
./elasticsearch -d
[1]: max virtual memory areas vm.max_map_count [65530] is too low, increase to at least [262144]错误
# 临时修改
sysctl -w vm.max_map_count=262144
# 永久修改
# CentOS 或 Manjaro
vim /etc/sysctl.conf

vm.max_map_count=655360

sysctl -p
[1]: max file descriptors [4096] for elasticsearch process is too low, increase to at least [65535] 错误
# 编辑 /etc/security/limits.conf
vim /etc/security/limits.conf

* soft nofile 65536
* hard nofile 131072
* soft nproc 4096
* hard nproc 4096
[1]: max number of threads [2048] for user [esuser] is too low, increase to at least [4096] 错误
# 查看
ulimit -a
# 临时修改参数
ulimit -u 4096
2个端口,9200是外部的,9300是es集群内部通信的。
浏览器直接访问: http://192.168.123.26:9200
安装elasticsearch header
通过搭建服务的方式
- git clone git://github.com/mobz/elasticsearch-head.git
- cd elasticsearch-head
- npm install
- npm run start
这种方式会有跨域问题, 需要修改 elasticsearch.yml 配置文件, 修改 http.cors.enabled: true 和 http.cors.allow-origin: "*" 属性.
通过浏览器插件
[谷歌插件]https://chrome.google.com/webstore/detail/elasticsearch-head/ffmkiejjmecolpfloofpjologoblkegm/
索引基本操作
使用RestClient测试.
### 测试是否可连接
GET http://LOCALHOST:9200
Accept: application/json

### 查看健康状态
GET http://192.168.123.26:9200/_cluster/health
Accept: application/json

### 集群节点
GET http://192.168.123.26:9200/_cat/nodes?pretty
Accept: application/json

### 自定义模板
GET http://192.168.123.197:9200/_template/logstash-test/
Accept: application/json
### 新建模板
PUT http://192.168.123.197:9200/_template/logstash-test/
Content-Type: application/json

{
  "order": 0,
  "version": 1,
  "index_patterns": [
    "*"
  ],
  "settings": {
    "index": {
      "refresh_interval": "5s"
    }
  },
  "mappings": {
    "dynamic_templates": [
      {
        "message_field": {
          "path_match": "message",
          "mapping": {
            "norms": false,
            "type": "text"
          },
          "match_mapping_type": "string"
        }
      },
      {
        "string_fields": {
          "mapping": {
            "norms": false,
            "type": "text",
            "analyzer": "ik_max_word",
            "fields": {
              "keyword": {
                "ignore_above": 256,
                "type": "keyword"
              }
            }
          },
          "match_mapping_type": "string",
          "match": "*"
        }
      }
    ],
    "properties": {
      "@timestamp": {
        "type": "date"
      },
      "geoip": {
        "dynamic": true,
        "properties": {
          "ip": {
            "type": "ip"
          },
          "latitude": {
            "type": "half_float"
          },
          "location": {
            "type": "geo_point"
          },
          "longitude": {
            "type": "half_float"
          }
        }
      },
      "@version": {
        "type": "keyword"
      }
    }
  },
  "aliases": {}
}

### 创建索引
PUT  http://LOCALHOST:9200/index_temp
Content-Type: application/json

{
    "settings": {
        "index": {
            "number_of_shards": "2",
            "number_of_replicas": "0"
        }
    }
}

### 删除索引
DELETE http://LOCALHOST:9200/index_temp
Accept: application/json

### 查看某一索引
GET http://LOCALHOST:9200/index_demo
Accept: application/application/json

### 查看所有索引
GET http://LOCALHOST:9200/_cat/indices?v
Accept: application/application/json

### mapping
### index 是否会被索引
### text 可以被分词
### keyword 不能被分词(按照词汇进行拆分),精确匹配. 例如用户手机号,qq号
PUT http://LOCALHOST:9200/index_mapping
Content-Type: application/json

{
    "settings": {
        "index": {
            "number_of_shards": "2",
            "number_of_replicas": "0"
        }
    },
    "mappings": {
        "properties": {
            "realname": {
                "type": "text",
                "index": true
            },
            "username": {
                "type": "keyword",
                "index": false
            }
        }
    }
}

### _analyze 分词 英文默认是支持的 username是不会分词的,因为类型是keyword
GET http://192.168.123.26:9200/stu/_analyze
Content-Type: application/json

{
    "field": "description",
    "text": "天气"
}

### 修改索引是不支持的!!!但是可以添加新的内容
PUT http://LOCALHOST:9200/index_mapping/_mapping
Content-Type: application/json

{
    "properties": {
        "id": {
            "type": "long"
        },
        "age": {
            "type": "integer"
        },
        "money": {
            "type": "double"
        },
        "balance": {
            "type": "float"
        },
        "sex": {
            "type": "byte"
        },
        "score": {
            "type": "short"
        },
        "is_teenger": {
            "type": "boolean"
        },
        "birthday": {
            "type": "date"
        },
        "relationship": {
            "type": "object"
        }
    }
}

### 文档基本操作 先创建一个新的文档
PUT http://LOCALHOST:9200/doc_tmp
Content-Type: application/json

{
    "settings": {
        "index": {
            "number_of_shards": "1",
            "number_of_replicas": "0"
        }
    }
}

### 文档基本操作 -- 新增. 1就是新添加文档的主键(document_id). 如果mapping还没创建,会自动创建mapping,如果id没有的话,也会自动创建id. 需要注意,自动创建,如果是text类型,会多一个 field 字段,根据这个字段可以为搜索提供多种的索引模式
POST http://LOCALHOST:9200/doc_tmp/_doc/1
Content-Type: application/json

{
    "id": 1001,
    "name": "lgq",
    "desc": "hello es",
    "create_date": "2020-11-19"
}

#### 添加测试数据
POST http://LOCALHOST:9200/doc_tmp/_doc/5
Content-Type: application/json

{
    "id": 1005,
    "name": "lgq-5",
    "desc": "都知道,只要有意义,那么就必须慎重考虑. ",
    "create_date": "2019-01-16"
}

### 文档基本操作 -- 删除
### 返回结果中的 _version 是随着请求的次数+1的,
### 不管结果如何. 实际上,删除不是真正的删除,只是逻辑上的删除,添加了删除的标记,在磁盘的文件过多时,进行merge操作,才会做被动的清理,清除那些被标记的文档!!
DELETE http://LOCALHOST:9200/doc_tmp/_doc/5
Accept: application/json

### 文档基本操作 -- 修改.
### es是基于lucene的,而luncene的修改实际是全量替换的,而为什么es可以局部修改. 实际只是es又封装多了一层,对此操作做了处理.
POST http://LOCALHOST:9200/doc_tmp/_doc/5/_update
Content-Type: application/json

{
    "doc":{
        "desc": "这样看来, 总结的来说, 拿破仑·希尔在不经意间这样说过,不要等待,时机永远不会恰到好处. 这似乎解答了我的疑惑. "
    }
}

### 全量替换
PUT http://LOCALHOST:9200/doc_tmp/_doc/5
Content-Type: application/json

{
    "id": 1005,
    "name": "lgq-5",
    "desc": "都知道,只要有意义,那么就必须慎重考虑. ",
    "create_date": "2019-01-16"
}

### 文档基本操作 -- 查询. 根据 _id 查询,这样查询会把所有的属性都返回.
GET http://LOCALHOST:9200/doc_tmp/_doc/1
Accept: application/json

### 文档基本操作 -- 查询所有.
GET http://LOCALHOST:9200/doc_tmp/_doc/_search
Accept: application/json

### 文档基本操作 -- 查询. 根据 _id 查询,查询部分字段
GET http://LOCALHOST:9200/doc_tmp/_doc/1?_source=id,name
Accept: application/json

### 文档基本操作 -- 查询. 判断文档是否存在,不存在返回404,存在返回200
HEAD http://LOCALHOST:9200/doc_tmp/_doc/4
Accept: application/json

### 文档乐观锁控制 if_seq_no 与 if_primary_term
POST http://LOCALHOST:9200/doc_tmp/_doc/2001
Content-Type: application/json

{
    "id": 2001,
    "name": "lgq-2001",
    "desc": "lgq-2001",
    "create_date": "2020-11-19"
}

### 查询
GET http://LOCALHOST:9200/doc_tmp/_doc/2001
Accept: application/json

### 更新 使用过时的API
POST http://LOCALHOST:9200/doc_tmp/_update/2001?version=5
Content-Type: application/json

{
    "doc": {
        "name": "lgq-2002"
    }
}

### 更新 使用新的方法 乐观锁
POST http://LOCALHOST:9200/doc_tmp/_update/2001?if_seq_no=5&if_primary_term=1
Content-Type: application/json

{
    "doc": {
        "name": "lgq-2003"
    }
}

### 分词. 全局分析.
### 内置的分词器: standard simple whitespace stop keyword
POST http://LOCALHOST:9200/_analyze
Content-Type: application/json

{
    "analyzer": "simple",
    "text": "To be or not to be. That is a question"
}

### 分词. 根据现有的索引库.
POST http://LOCALHOST:9200/doc_tmp/_analyze
Content-Type: application/json

{
    "analyzer": "standard",
    "field": "create_date",
    "text": "lgq 212"
}

### ik分词器测试. ik_max_word ik_smart
POST http://LOCALHOST:9200/_analyze
Content-Type: application/json

{
    "analyzer": "ik_max_word",
    "text": "骚年,星期五,到底应该如何实现.  星期五,发生了会如何,不发生又会如何. "
}

### DSL学习. 创建新的索引.
PUT  http://LOCALHOST:9200/shop
Content-Type: application/json

{
    "settings": {
        "index": {
            "number_of_shards": "3",
            "number_of_replicas": "0"
        }
    }
}

### 创建映射(定义索引结构)
PUT http://LOCALHOST:9200/shop/_mapping
Content-Type: application/json

{
    "properties": {
        "id": {
            "type": "long"
        },
        "age": {
            "type": "integer"
        },
        "username": {
            "type": "keyword"
        },
        "nickname": {
            "type": "text",
            "analyzer": "ik_max_word"
        },
        "money": {
            "type": "float"
        },
        "desc": {
            "type": "text",
            "analyzer": "ik_max_word"
        },
        "sex": {
            "type": "byte"
        },
        "birthday": {
            "type": "date"
        },
        "avatar": {
            "type": "text",
            "analyzer": "ik_max_word"
        }
    }
}

### 添加数据
POST http://LOCALHOST:9200/shop/_doc/1001
Content-Type: application/json

{
    "id": 1001,
    "age": 18,
    "username": "lgq-01",
    "nickname":"devlgq",
    "money": 88.8,
    "desc":"我在慕课网学习java和前端,学习到了很多知识",
    "sex": 0,
    "birthday": "1992-12-24",
    "avatar": "https://www.imooc.com/static/img/index/logo.png"
}
ES数据类型
- text, keyword
- long, integer, short, byte
- double, float
- boolean
- date
- object
- 数组不能混, 类型需要一致
文档乐观锁控制
当一个数据并发被几个线程操作, 如果版本匹配就可以更新, 如果不匹配不让更新。
关键字段 if_seq_no 和 if_primary_term。_seq_no表示版本,修改会进行累加;_primary_term表示文档所在位置。
POST http://LOCALHOST:9200/doc_tmp/_update/2001?if_seq_no=5&if_primary_term=1
Content-Type: application/json

{
    "doc": {
        "name": "lgq-2003"
    }
}
分词
把文本转换成一个个的单词, 分词称之为analysis. es默认只对英文做分词, 中文不支持, 每个中文都会被拆分为独立的个体.
es内置分词器
- standard: 默认分词, 单词会被拆分, 大小会转换成小写.
- simple: 按照非字母分词. 大写转小写.
- whitespace: 按照空格分词. 忽略大小写.
- stop: 去除无意义单词. 比如: the/a/an/is…
- keyword: 不做分词, 把整个文本作为一个单独的关键字.
ik中文分词器
github地址: https://github.com/medcl/elasticsearch-analysis-ik
下载插件包安装
unzip elasticsearch-analysis-ik-7.10.0.zip -d /usr/local/elasticsearch-7.10.0/plugins/ik
# 然后重启es即可
# 测试
# create mapping
curl -XPOST http://localhost:9200/doc_tmp/_mapping -H 'Content-Type:application/json' -d'
{
        "properties": {
            "content": {
                "type": "text",
                "analyzer": "ik_max_word",
                "search_analyzer": "ik_smart"
            }
        }

}'

curl -XPOST http://localhost:9200/_analyze -H 'Content-Type:application/json' -d'
{
    "analyzer": "ik_max_word",
    "text": "星期五, 到底应该如何实现.  星期五, 发生了会如何, 不发生又会如何. "
}'
下载源码编译安装
git clone https://github.com/medcl/elasticsearch-analysis-ik
cd elasticsearch-analysis-ik
git checkout tags/{version}
mvn clean
mvn compile
mvn package
编译完成之后, 拷贝和解压release下面的文件#{project_path}/elasticsearch-analysis-ik/target/releases/elasticsearch-analysis-ik-*.zip到es的插件目录, 然后重启es。
自定义字典
配置文件 IKAnalyzer.cfg.xml 在 {conf}/analysis-ik/config/IKAnalyzer.cfg.xml 或者 {plugins}/elasticsearch-analysis-ik-*/config/IKAnalyzer.cfg.xml。
<?xml version="1.0" encoding="UTF-8"?>
<!DOCTYPE properties SYSTEM "http://java.sun.com/dtd/properties.dtd">
<properties>
    <comment>IK Analyzer 扩展配置</comment>
    <!--用户可以在这里配置自己的扩展字典 -->
    <entry key="ext_dict">custom/mydict.dic;custom/single_word_low_freq.dic</entry>
     <!--用户可以在这里配置自己的扩展停止词字典-->
    <entry key="ext_stopwords">custom/ext_stopword.dic</entry>
    <!--用户可以在这里配置远程扩展字典 -->
    <entry key="remote_ext_dict">location</entry>
    <!--用户可以在这里配置远程扩展停止词字典-->
    <entry key="remote_ext_stopwords">http://xxx.com/xxx.dic</entry>
</properties>
深度搜索
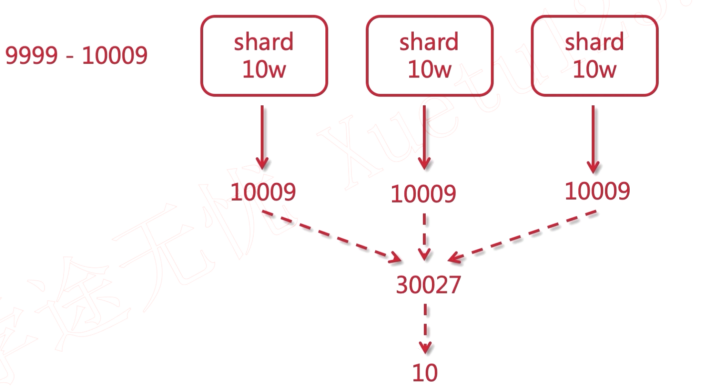
性能的影响. 所以往往会有页码的控制或者使用滚动搜索。
es默认最大10000, 可以通过设置index.max_result_window参数突破限制。
Result window is too large, from + size must be less than or equal to: [10000] but was [10009]. See the scroll api for a more efficient way to request large data sets. This limit can be set by changing the [index.max_result_window] index level setting.
### 分页。 深度分页
POST http://localhost:9200/shop/_search
Content-Type: application/json

{
    "query": {
        "match_all": {}
    },
    "from": 9999,
    "size": 10,
    "_source": [
        "nickname",
        "desc"
    ]
}

### 分页。 查看设置
GET http://localhost:9200/shop/_settings
Accept: application/json

### 分页。 修改设置
PUT http://localhost:9200/shop/_settings
Content-Type: application/json

{
    "index.max_result_window": 10000
}

#### 滚动搜索  scroll=1m 滚动所存留的时间,相当于一个会话。
### size 每次滚动查询的数据量。
### _scroll_id 查询返回的,用于下一次查询使用
POST http://localhost:9200/shop/_search?scroll=1m
Content-Type: application/json

{
    "query": {
        "match_all": {}
    },
    "sort": ["_doc"],
    "size": 5
}

### 使用 scroll_id 进行下一次查询
POST http://localhost:9200/_search/scroll
Content-Type: application/json

{
    "scroll_id": "FGluY2x1ZGVfY29udGV4dF91dWlkDnF1ZXJ5VGhlbkZldGNoAxZ5R0NkcEpIN1JZLXZhcnJtVzN6RHl3AAAAAAAAAXoWczE3bFRKMFlTcFdtRlNlWUtRUGppZxZ5R0NkcEpIN1JZLXZhcnJtVzN6RHl3AAAAAAAAAXkWczE3bFRKMFlTcFdtRlNlWUtRUGppZxZ5R0NkcEpIN1JZLXZhcnJtVzN6RHl3AAAAAAAAAXsWczE3bFRKMFlTcFdtRlNlWUtRUGppZw==",
    "scroll": "1m"
}
批量操作
- { action: {metadata} } 代表批量操作的类型, 可以是新增, 删除或修改
\n是每行结尾必须填写的一个规范, 每一行包括最后一行都要写, 用于es的解析- { request }是请求body, 增加和修改操作需要, 删除操作则不需要
action
create: 如果文档存在, 那么就创建它. 存在会报错. 发生异常报错不会影响其它操作.index: 粗行家一个新文档或者替换一个现有的文档.update: 部分更新一个文档.delete: 删除一个文档.
metadata中需要指定要操作的文档 _index, _type 和 _id, _index, _type 也可以在url中指定.
批量操作的请求是会加载到内存中的, 因此请求越大, 内存就越大, 所以, 一旦这个请求量大于一个最佳值, 性能就不会再提升了, 甚至还会降低. 但是最佳值不是一个固定值, 他是完全取决于硬件, 文档大小和复杂度, 索引和搜索负载的整体情况。
### 批量查询。 found 表示是否有搜索到
POST http://localhost:9200/shop/_mget
Content-Type: application/json

{
    "ids": [1001, 1003]
}

### 批量操作,bulk -- create. 创建.
POST http://localhost:9200/_bulk
Content-Type: application/x-ndjson

{"create": {"_index": "shop", "_id": "2001"}}
{"id": "2001", "age": 26, "username": "hello", "nickname": "吉姆·罗恩", "money": 166.8, "desc": "要想清楚,在吗,到底是一种怎么样的存在。", "sex": 1, "birthday": "1997-05-15", "avatar": "https://www.imooc.com/static/img/index/logo.png"}
{"create": {"_index": "shop", "_id": "2002"}}
{"id": "2002", "age": 17, "username": "guava", "nickname": "迈克尔·F·斯特利", "money": 666.8, "desc": "迈克尔·F·斯特利曾经说过,最具挑战性的挑战莫过于提升自我。带着这句话,我们还要更加慎重的审视这个问题。", "sex": 0, "birthday": "1772-04-14", "avatar": "https://www.imooc.com/static/img/index/logo.png"}


### 批量操作,bulk -- index. 如果存在就修改.
POST http://localhost:9200/shop/_bulk
Content-Type: application/x-ndjson

{"index": {"_id": "2001"}}
{"id": "2001", "age": 26, "username": "java", "nickname": "吉姆·罗恩", "money": 166.8, "desc": "要想清楚,在吗,到底是一种怎么样的存在。", "sex": 1, "birthday": "1997-05-15", "avatar": "https://www.imooc.com/static/img/index/logo.png"}
{"index": {"_id": "2002"}}
{"id": "2002", "age": 17, "username": "cpp", "nickname": "迈克尔·F·斯特利", "money": 666.8, "desc": "迈克尔·F·斯特利曾经说过,最具挑战性的挑战莫过于提升自我。带着这句话,我们还要更加慎重的审视这个问题。", "sex": 0, "birthday": "1772-04-14", "avatar": "https://www.imooc.com/static/img/index/logo.png"}


### 批量操作,bulk -- update. 与 index 不同的是,update是修改,不需要添加所有字段,只需要传需要修改的字段即可,index是需要所有字段的,如果某一字段缺失,会为空。
POST http://localhost:9200/shop/_bulk
Content-Type: application/x-ndjson

{"update": {"_id": "2001"}}
{"doc": {"age": 28}}
{"index": {"_id": "2002"}}
{"id": "2002", "age": 17, "username": "php", "nickname": "迈克尔·F·斯特利", "money": 666.8, "desc": "迈克尔·F·斯特利曾经说过,最具挑战性的挑战莫过于提升自我。带着这句话,我们还要更加慎重的审视这个问题。", "sex": 0, "birthday": "1772-04-14", "avatar": "https://www.imooc.com/static/img/index/logo.png"}


### 批量操作, bulk -- delete.
POST http://localhost:9200/shop/_bulk
Content-Type: application/x-ndjson

{"delete": {"_id": "2001"}}
{"delete": {"_id": "2002"}}
ES集群搭建
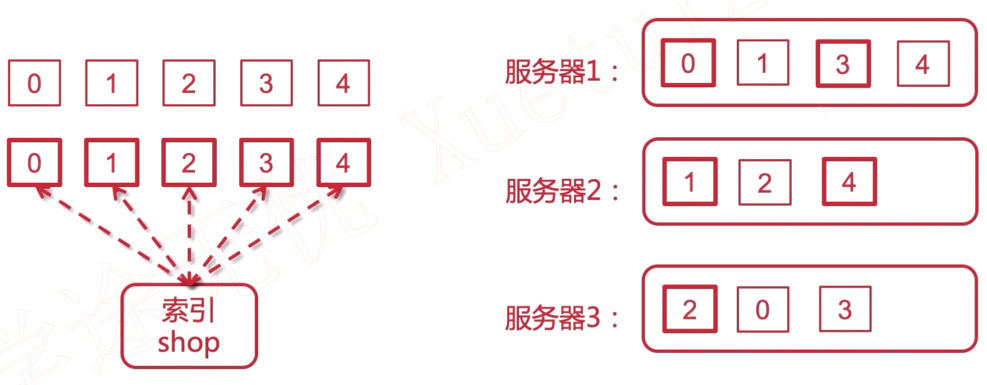
主要参数
# 节点名字
node.name: es-node1
# 主节点 为了有可能成为master
node.master: true
# 数据节点 文档的处理
node.data: true
# 其他节点的ip
discovery.seed_hosts: ["192.168.123.26", "192.168.123.129", "192.168.123.197"]
cluster.initial_master_nodes: ["es-node1"]
集群脑裂
老版本才有的问题。
server1宕机再恢复之后, 有可能自己成为一个集群, 而server2和server3组成一个集群, 这种现象被称作为集群脑裂。
原因: 默认最小投票人数=1. server1可以自己给自己投票, 达到最小投票人数, 所以就可以成为master. server1是一个不完整的集群.
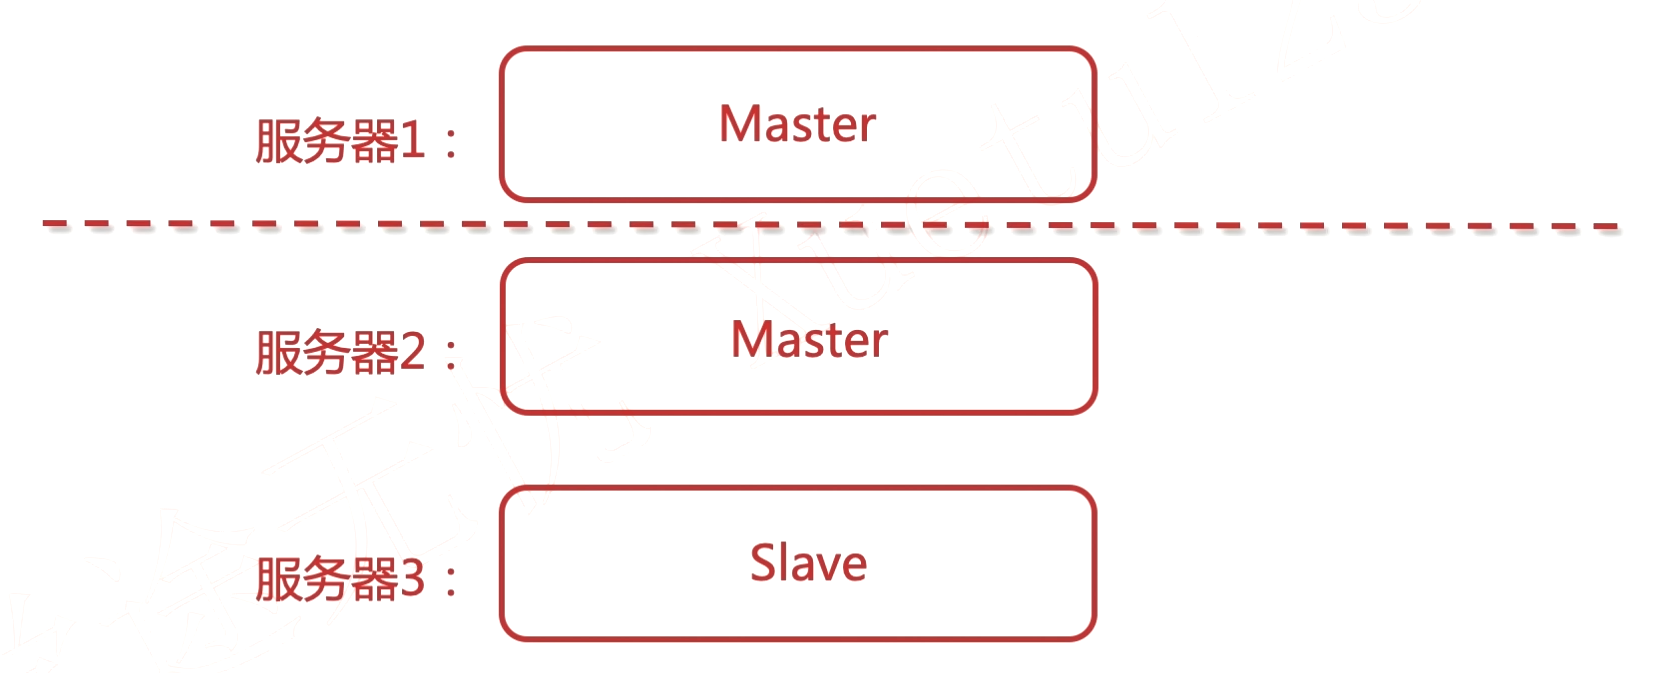
解决方案: 投票数应该是超过半数人以上。参数discovery.zen.minmum_master_nodes设置为 (N/2) + 1。N 是设置了node.master: true的节点个数。
集群的文档读写原理

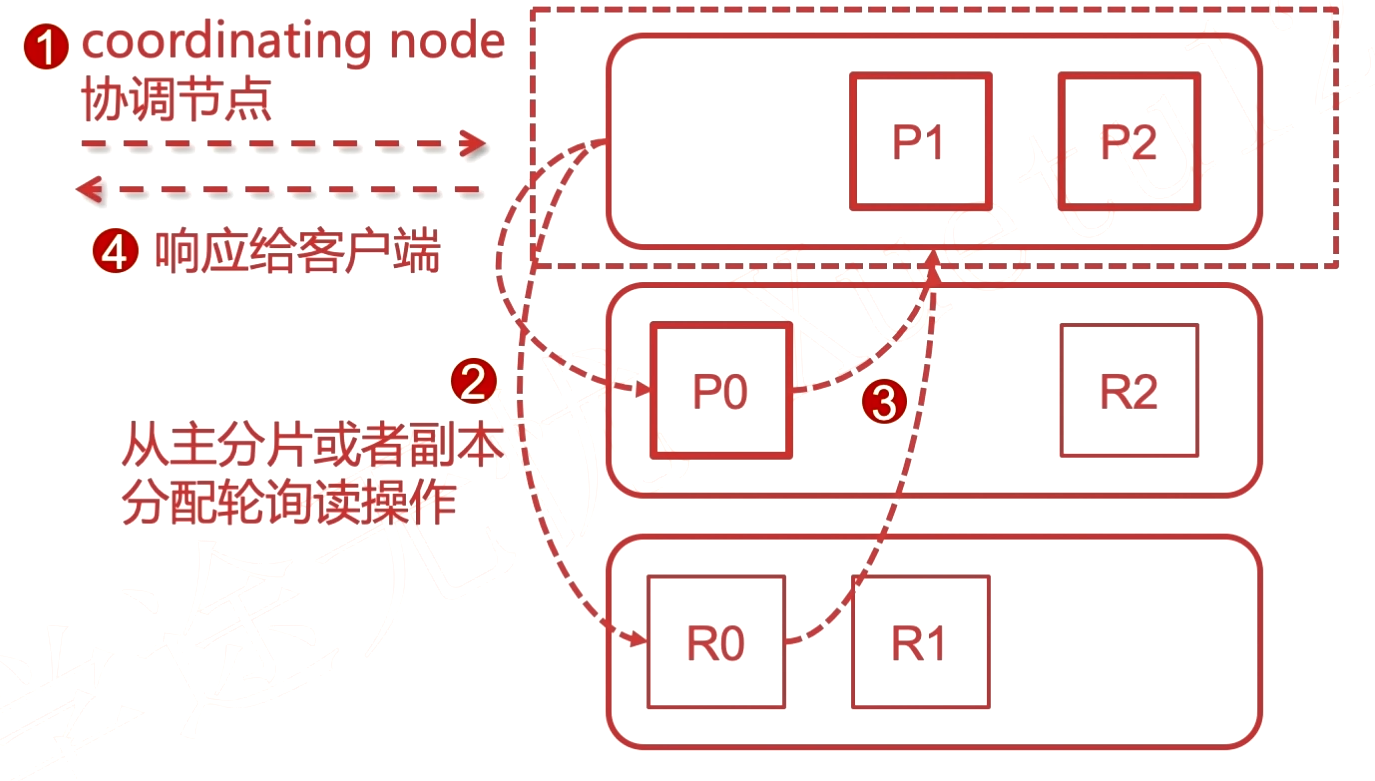
有粗框的是主分片(primary shards), 而细框的是副本(replicas shards).
其中一个节点接受了用户的请求, 这个节点此时就是协调节点(coordinating node), 相当于一个路由(controller), 会进行转发到对应的节点。
例子: 请求写入在 1分片 上的数据, 通过协调节点, 转发给 1主分片, 然后同步数据到备份节点, 最后再通知给协调节点。
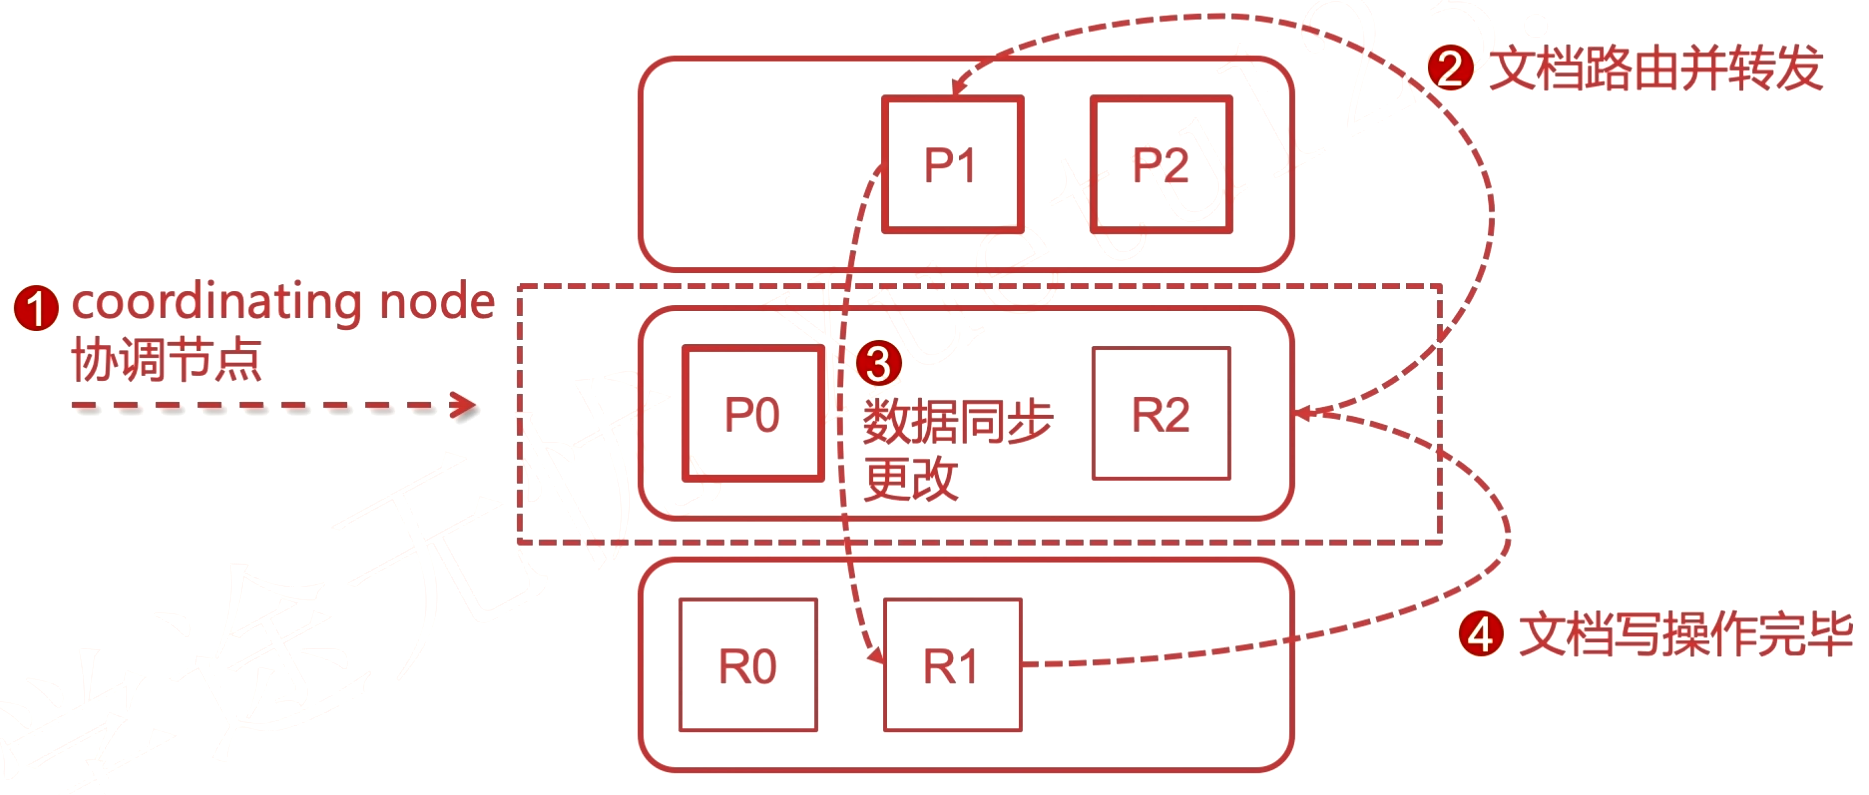
primary shards 和 replicas shards之间存在负载均衡。
SpringBoot集成ElasticSearch
添加依赖
<dependency>
    <groupId>org.springframework.boot</groupId>
    <artifactId>spring-boot-starter-data-elasticsearch</artifactId>
</dependency>
创建ElasticsearchRestTemplate
@Configuration
public class RestConfigClient extends AbstractElasticsearchConfiguration {

    @Value("${es.host}")
    public String[] hosts;
    @Value("${es.port}")
    public int port;
    @Value("${es.scheme}")
    public String scheme;

    private String[] makeHttpAndPort(){
        return Arrays.stream(hosts).map(host -> host + ":" + port).toArray(String[]::new);
    }

    @Override
    @Bean()
    public RestHighLevelClient elasticsearchClient() {
        final ClientConfiguration clientConfiguration = ClientConfiguration.builder()
                .connectedTo(makeHttpAndPort())
                .build();
        return RestClients.create(clientConfiguration).rest();
    }

}
logstash 数据采集同步
以id或者update_time作为同步边界。
使用logstash-input-jdbc插件。
注意: logstash版本号和es版本最好保持一致。
logstash 安装配置
安装在 192.168.123.26。
Logstash是ElasticStack中的一个技术. 是一个数据采集引擎, 可以从数据库采集数据到es中。可以通过设置自增id主键或者时间来控制数据的自动同步时间就是用于给logstash进行识别的。
- id: 假设现在有1000条数据, logstash识别后会进行一次同步, 同步完会记录这个id为1000, 以后数据库新增数据, 那么id会一直累加, logstash会有定时任务, 发现有id大于1000了, 把增量加入到es中。
- 时间: 同理, 一开始同步1000条数据, 每条数据都有一个字段为time, 初次同步完毕后, 记录这个time, 下次同步的时候进行时间比较, 如果超过这个时间的, 那么就可以做同步, 这里可以同步新增数据, 或者修改元数据, 因为同一条数据的时间更改会被识别, 而id则不会。
tar -zxvf logstash-7.10.0-linux-x86_64.tar.gz -C /usr/local
mkdir sync
cd sync
vim logstash-db-sync.conf
# 拷贝驱动
cp /home/software/mysql-connector-java-8.0.18.jar .
# 启动
./logstash -f ../sync/logstash-db-sync.conf
# 后台启动
nohup ./logstash -f ../sync/logstash-db-sync.conf 2>&1 &
-- 更新时间 +4个月
update items set updated_time = DATE_ADD(updated_time, INTERVAL 4 MONTH)
自定义模板配置中文分词器,logstash-ik.conf配置文件。
{
  "order": 0,
  "version": 1,
  "index_patterns": [
    "*"
  ],
  "settings": {
    "index": {
      "refresh_interval": "5s"
    }
  },
  "mappings": {
    "dynamic_templates": [
      {
        "message_field": {
          "path_match": "message",
          "mapping": {
            "norms": false,
            "type": "text"
          },
          "match_mapping_type": "string"
        }
      },
      {
        "string_fields": {
          "mapping": {
            "norms": false,
            "type": "text",
            "analyzer": "ik_max_word",
            "fields": {
              "keyword": {
                "ignore_above": 256,
                "type": "keyword"
              }
            }
          },
          "match_mapping_type": "string",
          "match": "*"
        }
      }
    ],
    "properties": {
      "@timestamp": {
        "type": "date"
      },
      "geoip": {
        "dynamic": true,
        "properties": {
          "ip": {
            "type": "ip"
          },
          "latitude": {
            "type": "half_float"
          },
          "location": {
            "type": "geo_point"
          },
          "longitude": {
            "type": "half_float"
          }
        }
      },
      "@version": {
        "type": "keyword"
      }
    }
  },
  "aliases": {}
}
完整配置文件logstash-db-sync.conf。
# 输入
input {
    jdbc {
        # 设置 MySql/MariaDB 数据库url以及数据库名称
        jdbc_connection_string => "jdbc:mysql://127.0.0.1:3306/schema?useUnicode=true&characterEncoding=UTF-8&autoReconnect=true"
        # 用户名和密码
        jdbc_user => "root"
        jdbc_password => "xxxx"
        # 数据库驱动所在位置,可以是绝对路径或者相对路径
        jdbc_driver_library => "/usr/local/logstash-7.10.0/sync/mysql-connector-java-8.0.18.jar"
        # 驱动类名
        jdbc_driver_class => "com.mysql.cj.jdbc.Driver"
        # 开启分页
        jdbc_paging_enabled => "true"
        # 分页每页数量,可以自定义
        jdbc_page_size => "1000"
        # 执行的sql文件路径
        statement_filepath => "/usr/local/logstash-7.10.0/sync/execute.sql"
        # 设置定时任务间隔  含义:分、时、天、月、年,全部为*默认含义为每分钟跑一次任务
        schedule => "* * * * *"
        # 索引类型
        # type => "_doc"
        # 是否开启记录上次追踪的结果,也就是上次更新的时间,这个会记录到 last_run_metadata_path 的文件
        use_column_value => true
        # 记录上一次追踪的结果值
        last_run_metadata_path => "/usr/local/logstash-7.10.0/sync/track_time"
        # 如果 use_column_value 为true, 配置本参数,追踪的 column 名,可以是自增id或者时间
        tracking_column => "updatedTime"
        # tracking_column 对应字段的类型
        tracking_column_type => "timestamp"
        # 是否清除 last_run_metadata_path 的记录,true则每次都从头开始查询所有的数据库记录
        clean_run => false
        # 数据库字段名称大写转小写
        lowercase_column_names => false
    }
}
# 输出
output {
    elasticsearch {
        # es地址
        hosts => ["192.168.123.26:9200"]
        # 同步的索引名
        index => "foodie-items-ik"
        # 设置_docID和数据库的id相同
        # document_id => "%{id}"
        document_id => "%{itemId}"
        # 自定义模板名称
        template_name => "logstash"
        # 模板所在位置
        template => "/usr/local/logstash-7.10.0/sync/logstash-ik.json"
        # 重写模板开启
        template_overwrite => true
        # 默认为true, false关闭 logstash 自动模板功能, 如果自定义模板, 需要设置为 false
        manage_template => false
    }
    # 日志输出
    stdout {
        codec => json_lines
    }
}


